Charging Off-Grid Battery Banks: High-Efficiency Alternator DC-DC Chargers & Solar Integration
To maintain a continuous remote office on the road or at an off-grid homestead, keeping your primary house battery bank and portable power stations charged is critical. Relying solely on a static solar array leaves you vulnerable during consecutive overcast days, heavy winter storm cycles, or when camp spaces are heavily shaded by dense tree canopies.
The ultimate solution for vehicular overlanders, camper vans, and custom expedition rigs is a dual-input charging topology. By pairing your vehicle's engine alternator with your solar panel array through a smart DC-to-DC battery charger, you can aggressively replenish your lithium iron phosphate (LiFePO4) storage banks while driving down the highway, then transition seamlessly to solar harvesting the moment you park.
Why can't I charge a lithium battery directly from my alternator?
You cannot simply wire a modern lithium house battery directly to your vehicle's starter battery or stock alternator lines. Lithium cells feature extremely low internal resistance and will pull maximum current from the charging system. This constant demand will quickly overheat and destroy a standard automotive alternator.
Furthermore, smart alternators found in modern trucks and vans dynamically scale down their voltage output to save fuel, which drops the charging current below the minimum levels required to charge a house battery. A dedicated multi-stage DC-DC battery charger acts as a smart structural buffer. It safely controls the current draw to protect your vehicle engine components while stepping up the output voltage to provide a complete, rapid charging profile.
Why choose Lithium (LiFePO4) over AGM batteries?
If you are deciding between a traditional AGM (lead-acid) battery and a lithium (LiFePO4) battery, lithium is by far the better choice for an off-grid build. Here is why:
- Faster Charging: Lithium batteries can absorb the high-speed charge from a DC-DC charger much faster than AGM batteries, getting you topped up quicker.
- More Usable Power: You can safely drain a lithium battery completely (up to 100% depth of discharge) without damaging it. Heavy AGM batteries should only be discharged to 50%, meaning a 100Ah AGM only really gives you 50Ah of usable power.
- Less Weight: Lithium batteries weigh less than half of what a comparable AGM battery weighs, which is a massive benefit for RV and van cargo capacities.
What are the best DC-DC chargers for RVs and vans?
To safely manage your auxiliary battery input lines, consider integrating these heavy-duty multi-stage components. Here is a quick comparison of our top recommendations:
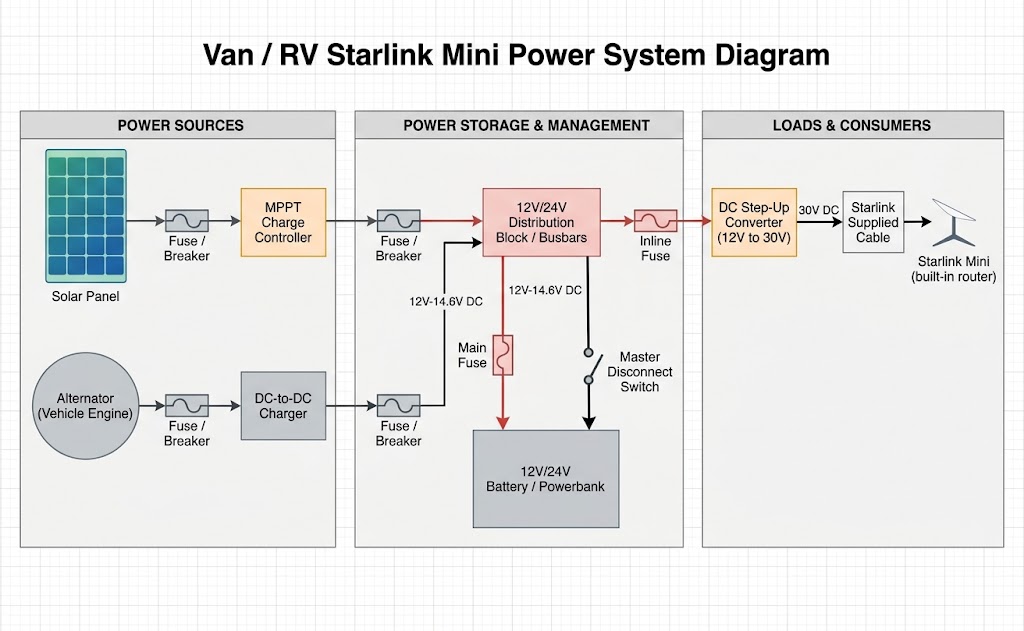
| Charger Model | Max Amperage | Built-in MPPT Solar Input? | Bluetooth App Integration? | Smart Alternator Compatible? | Link |
|---|---|---|---|---|---|
| LiTime 12V 40A DC-DC Charger | 40A | No (Requires separate controller) | No | Yes | Check Price |
| Renogy Dual Input DC-DC | 50A | Yes | Optional (Needs Module) | Yes | Check Price |
| Victron Energy Orion-Tr Smart | 30A | No (Requires separate controller) | Yes (Built-in) | Yes (Engine Run Detection) | Check Price |
What size wire do I need for a DC-to-DC charger?
Using the correct wire gauge (AWG) is one of the most important safety steps in any 12V electrical build. If your wire is too thin for the amount of power flowing through it, it can overheat and potentially cause a fire. For a standard 50A DC-to-DC charger, you will typically need at least 6 AWG or 4 AWG pure copper wire, depending on the distance from your alternator to the charger.
Ready to run your cables?
Make sure to consult our comprehensive 12-Volt Installation Guide to correctly map your direct DC routing paths, calculate wire gauges, and position your Blue Sea Systems ST Blade fuse blocks safely before you start crimping.
How do MPPT solar controllers improve off-grid charging?
While alternator charging handles power replenishment on drive days, a dedicated stationary solar array is mandatory for long-term off-grid homesteads. Fixed roof panels or ground-deployed solar arrays must route their raw photovoltaic (PV) voltage through a dedicated Maximum Power Point Tracking (MPPT) charge controller. Unlike cheap PWM regulators that slice off excess voltage, an MPPT controller dynamically drops high panel voltage to match your battery requirements while boosting output current—saving up to 30% more energy during overcast conditions.
When engineering a stationary homestead or large trailer system, choose panels with high open-circuit voltage ratings (Voc) and wire them in a series configuration. High-voltage arrays experience far less current resistance and drop significantly less power over the long wire runs spanning from ground mount racks or roof arrays down to your central utility storage vault.
How do I charge a portable power station while driving?
If you use a portable power station like an EcoFlow or Anker, you've probably noticed that charging it through your car's standard cigarette lighter takes a very long time. This happens because these stations limit the incoming electrical current (amps) to prevent overheating, which caps your charging speed at around 120 watts on a standard 12-volt car socket. To speed things up while you drive, a much better option is to use a 12V-to-24V boost adapter. By stepping the voltage up to 24 volts before it reaches your power station, you can safely deliver twice as much total power (240 watts) through the device's DC port without exceeding its amp limit—effectively cutting your charging time in half.
How to wire the 12V-to-24V boost adapter
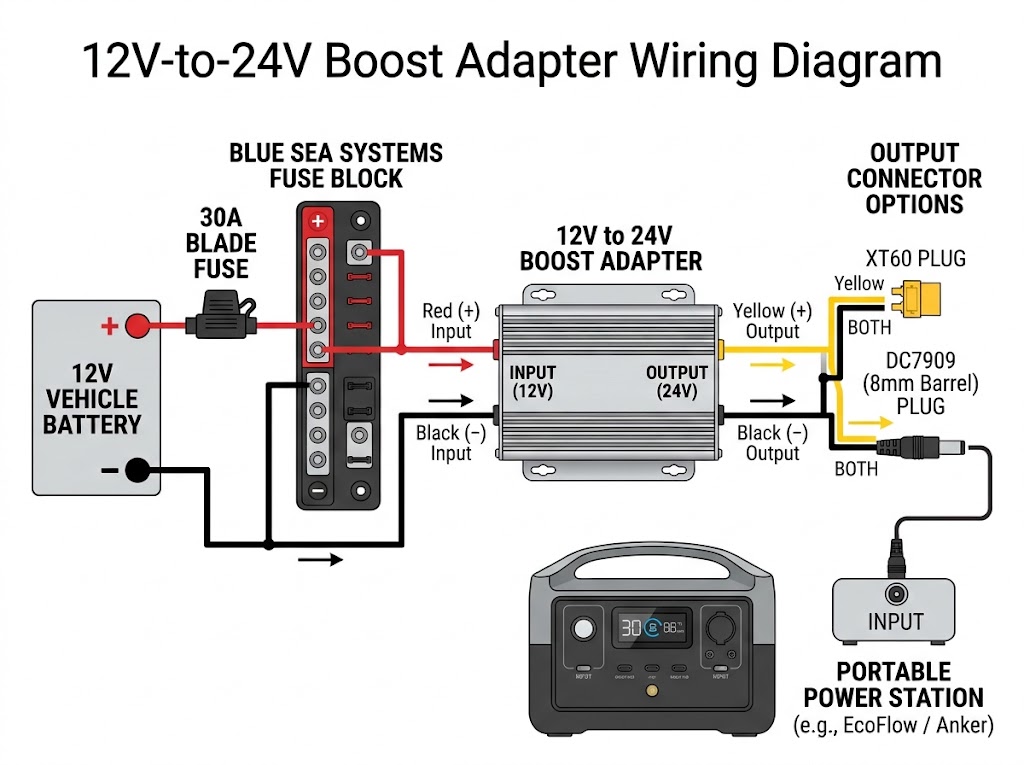
Step-by-step wiring path from a 12V vehicle battery, through a fuse block, and into a portable power station.
12V Electrical Safety Warning
Always disconnect the negative terminal of your vehicle's starting battery or your house battery bank before cutting, stripping, or connecting any wires to prevent accidental short circuits and blown fuses.
- Mount the Boost Converter: Fasten the boost adapter securely to a wall or board using the integrated mounting tabs. Because stepping up voltage creates heat, ensure the ribbed aluminum housing is exposed to open air and not buried under insulation.
- Wire the 12V Input (Battery Side): Run the adapter's input wires (usually labeled "Input" or colored Red/Black) to your 12V power source. Connect the Black wire to your negative busbar. Connect the Red wire to a positive 12V source, ideally a dedicated slot on a fuse block (like your Blue Sea Systems block) or an inline fuse holder wired directly to the battery.
- Install the Correct Fuse: Insert a blade fuse on the 12V input wire to protect the circuit. To calculate the size, divide the maximum wattage of your power station's DC input by 12, then add 20% for inefficiencies. For a 240W draw, use a 25A or 30A fuse.
-
Wire the 24V Output (Device Side): Connect the adapter's output wires (labeled "Output" or colored Yellow/Black) to the specific adapter plug required by your power station. Common portable power stations typically use one of two main connection types for their incoming 12V (or solar) DC charging ports:
- XT60: This is the standard for most modern power stations, including EcoFlow, due to its ability to handle high currents safely without melting.
- DC7909 (8mm Barrel): Also known as an 8mm connector, this is very common on Anker, Jackery, and Bluetti power stations, though many of these brands are transitioning to XT60 on their newer or higher-wattage models.
- Connect and Monitor: Reconnect your battery and test the new output plug with a multimeter to ensure it reads exactly 24 Volts. Finally, plug it into your portable power station's solar/car input port. The incoming wattage on your screen should immediately jump to approximately double what you were getting from the standard 12V cigarette lighter.
How do I put this complete charging system together?
Building a solid dual-charging setup keeps your lithium batteries full, so you can stay off-grid longer without worrying about plugging in. To learn how to run your internet gear directly off this battery power—without wasting energy on an AC inverter—check out our step-by-step guide on how to run the Starlink Mini without an inverter.
Once everything is wired up, it's a good idea to double-check that you actually have enough power to get through the day. Plug your equipment into our interactive 12-Volt Power Calculator to make sure your solar panels can easily keep up with your daily power usage.