How to Safely Drill and Mount an RV Starlink Pass-Through (The Right Way)
Running your Starlink cable through a cracked window or pinched door seal works in a pinch, but it lets in drafts, bugs, and rainwater while risking permanent damage to your wiring. Installing an exterior bulkhead socket like the Obeaming 30V Pass-Through gives you a clean, weather-tight port you can plug right into at camp.
Drilling into an RV wall might seem intimidating, but following a few straightforward steps ensures a completely sealed, professional finish.
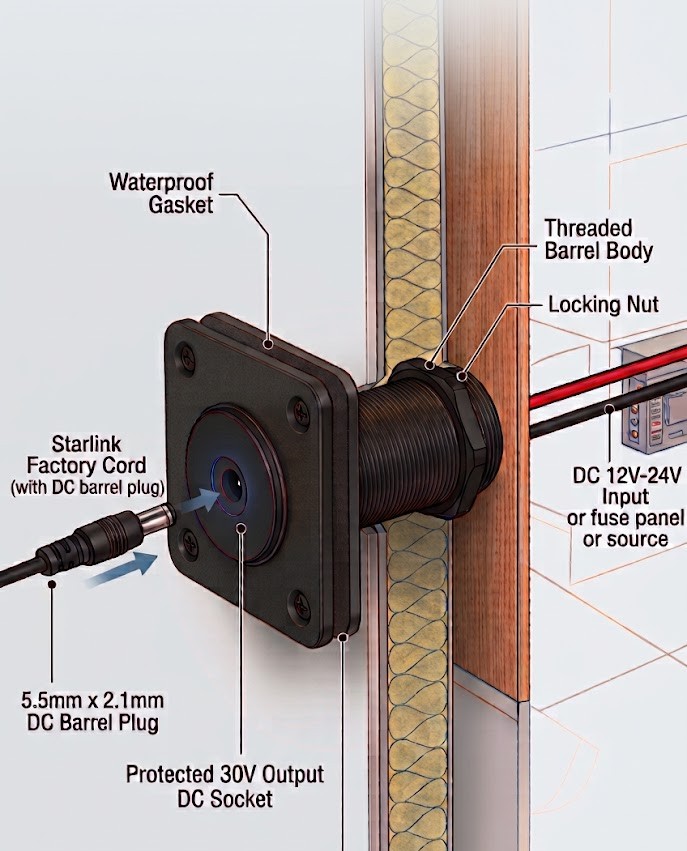
Tools and Materials You'll Need
- Cordless Drill: A standard variable-speed drill.
- Hole Saw or Spade Bit: Sized to match your socket's barrel (typically 1" to 1-1/8", check your hardware specs).
- Standard Drill Bit: Sized for small pilot holes (1/8").
- Exterior Sealant: High-grade RV sealant such as non-sag polyurethane or butyl tape (avoid standard silicone on RV siding).
- Masking Tape & Pencil: For marking and preventing gelcoat chip-out.
- Stud Finder / Flashlight: For inspecting the wall cavity.
Step 1: Pick and Verify Your Location
The most important step happens before you touch the drill. You must verify that the interior and exterior sides of the wall are completely clear.
- Inside Check: Locate an accessible area inside a low cabinet, under a dinette seat, or near your battery compartment. Ensure there are no hidden 12V wires, 120V Romex lines, plumbing pipes, or wall studs behind your chosen spot.
- Outside Check: Ensure the socket location is sheltered from direct wheel-splash, gives you comfortable access when plugging in, and sits on a flat section of siding.
Step 2: Prep the Siding and Drill a Pilot Hole
To keep fiberglass or aluminum siding from chipping or tearing, prep the exterior surface:
- Apply two layers of blue painter's tape over the exterior target area.
- Mark your center point on the tape with a pencil.
- Drill a small 1/8" pilot hole straight through from the inside out (or outside in, depending on where your clearance is tighter). Keep the drill perfectly level.
- Inspect both sides again to ensure the pilot hole exited exactly where expected.
Step 3: Cut the Main Pass-Through Hole
Fit your hole saw bit to the drill:
- Start cutting from the outside through the outer skin and insulation. Run the drill in reverse for the first few seconds on fiberglass gelcoat to score the perimeter cleanly without chipping, then switch to forward with light, steady pressure.
- Stop once you punch through the exterior wall and foam core.
- Move inside and finish the cut from the interior plywood paneling to avoid splintering the finished wood.
- Clean out any remaining foam, fiberglass dust, or burrs with a rag.
Step 4: Seal and Mount the Hardware
Proper sealing keeps moisture out of your RV's wall studs and floor framing for years to come:
- Dry Fit: Insert the socket into the hole to verify it sits completely flush against the siding and the screw holes line up.
- Apply Sealant: Remove the socket. Apply a generous ring of RV-grade sealant or a layer of butyl tape around the back flange of the socket plate, coating the perimeter and screw holes. Also run a thin bead around the inner lip of the drilled hole.
- Fasten: Press the socket firmly into place so sealant squeezes out around the edges. Drive the mounting screws by hand with a manual screwdriver to avoid stripping out fiberglass or thin aluminum backing.
- Smooth the Bead: Tool the squeezed-out sealant around the outer edge to create a smooth, continuous waterproof seal along the top and sides. Leave a tiny weep opening at the absolute bottom edge so trapped condensation can escape.
Step 5: Wire the Interior Connection
Once the exterior plate is securely mounted, connect the interior pigtail. If you are using a 12V DC barrel socket with the booster built in, route the leads through an inline fuse block to your battery system. For Ethernet bulkheads, connect your internal router cable, secure excess wire with zip ties, and test your Starlink connection.